Minimizing surveillance over broadband networks
This post describes how you can defeat the surveillance employed by AT&T, Comcast, and other service providers, while taking advantage of faster connection speeds they may offer in your area. In some parts of the US you don’t have much choice in service providers. Here’s more information on why you should consider using a VPN. In my case I wanted to use the Sonic.net VPN because it was included in the service I was already paying for, and Sonic has a solid rating from the EFF. The Sonic.net VPN is fast and reliable although it doesn’t offer some features of other VPN providers like international exit servers.

The setup described below is way more involved than what you need if you have a single computer. If that is the case, and you are a Sonic.net customer, then just go to beta.vpn.sonic.net, and in a few clicks you will have a working VPN!
In my case, I have multiple computers on a LAN, and a couple of additional requirements:
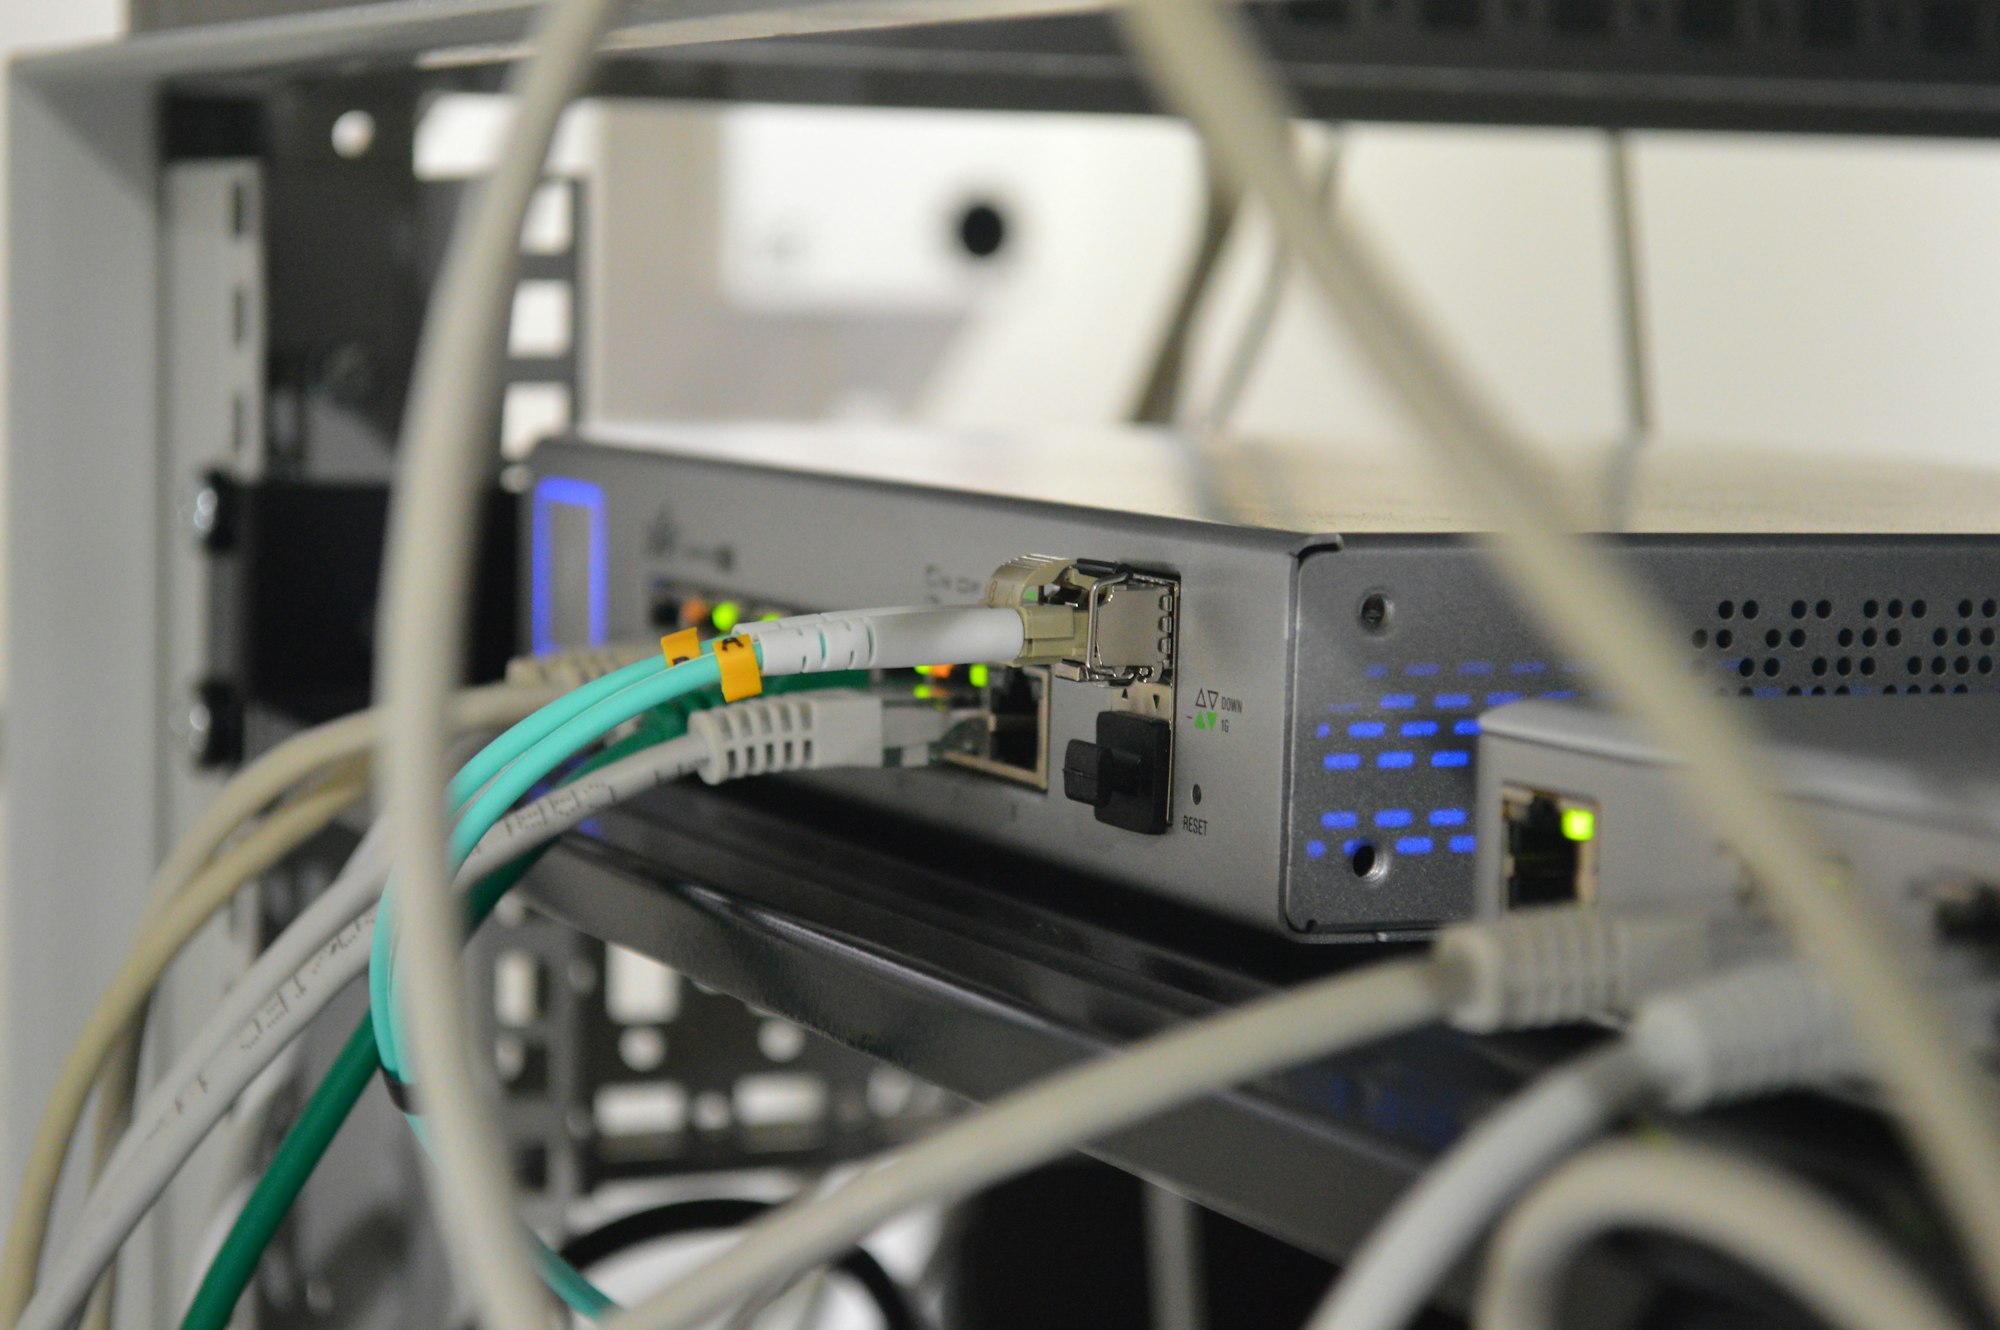
- I wanted to avoid using the AT&T-supplied VDSL modem, since it is essentially a black box. You don’t have control over certain features, and there’s really no way of knowing what it’s doing, or might do in the future. I didn’t want something like that on my LAN where it could potentially monitor my local traffic! Therefore, I had to add a supplementary router.
- I wanted to have the router handle my end of the VPN, so I didn’t have to manage it on each computer on my LAN.
If you have an ISP other than Sonic.net, you can still use this approach, just pick an alternative VPN provider that suits your needs. If you can get Sonic.net, then go with that. They have great customer support. (Although, they will not be able to provide you with support on the instructions in this article! Get the standard VPN configuration working first before trying this.)
This article, although written for a particular configuration of ISP, router, VDSL modem and VPN provider may be relevant in other cases. In my case, it looks like this
| ISP | Sonic.net FTTN 18Mbps service (over AT&T network — essentially the same as U-verse offering) |
| Modem | NVG589 supplied by AT&T |
| Router | Netgear R7000 (flashed with free and open-source DD-WRT) |
| VPN | Sonic.net offers VPN service for free if you already have an account. It formerly only supported the Cisco/IPSEC flavor, but OpenVPN is now supported in Beta. |
You can also use a different Router/Modem combination. Best case scenario is a router that you can flash with DD-WRT.
Configuring the NVG589
- On Home Network → Subnets & DHCP I left the IP Address at 192.168.1.254 and changed the Subnet Mask to 255.255.255.240. I changed the DHCPv4 Start/End Addresses to 192.168.1.241/192.168.1.253. As it currently stands, I only have the one DHCP-static passthrough route to the R7000. Changing the Subnet Mask is optional, but was recommended somewhere as creating a more efficient broadcast.
- To configure the NVG589 for Passthrough
- Go to Firewall → IP Passthrough
- Set Allocation Mode to Passthrough
- I set Passthrough Mode to DHCPS-fixed, and chose the router address from the list.
- I turned off the wireless capability of the NVG589, and am using the R7000 for wireless.
- I turned off Firewall Status → Packet Filter
- I did not turn off any of the Firewall Advanced options. I don’t think it will hurt to leave them on. They are redundant with what is provided by the R7000.
- This link was helpful for configuring the modem in bridge mode
- The NVG589 Manual
- These changes required a reboot.
Configuring the R7000
I bought a Netgear R7000 (about $180 on Amazon) and loaded it with DD-WRT router software. A cheaper router will work, you might even have one lying around that will work, just make sure it supports a flash image of DD-WRT that includes VPN.
- To load DD-WRT I followed these simple instructions.
- Note: The WPS feature that allows the router to automatically link up with devices like printers is not supported in DD-WRT. Minor inconvenience.
- Initially, I set it up with the Setup → WAN Setup → Automatic Configuration DHCP option. This is a good start, because it will automatically get the correct values via DHCP from the NVG589, so I recommend doing that first. However, ultimately I ended up going with the Static IP option, because it insisted on adding the AT&T DNS server and I didn’t want that. On my Linux and OSX platforms it’s possible to select something like “DHCP addresses only,” but DD-WRT doesn’t have that option. With the Static IP option I can specify my own DNS server. (It may also work to fill in all three of the DNS server fields, which should prevent the AT&T DNS server from being added, but I didn’t test that.)
- Why is the DNS issue important? Because in some cases your operating system or software may leak information about what sites you are visiting via the DNS service. Read more about DNS leaks here. You can also test for DNS leaks here. AT&T makes it impossible to change the DNS settings on the NVG589; you have to change DNS settings in a separate router, as we’re doing here, or manually on each computer.
- Note that your DNS server must allow recursive queries from your AT&T IP address. Sonic.net’s default DNS servers do not allow that, although they have alternate servers that do.
Without the VPN connection, the R7000 will receive the WAN IP Address of the NVG589 which is in AT&T’s address block, and you won’t be able to use ns1.sonic.net and ns2.sonic.net. However, when you are connected to the Sonic.net VPN, then it’s fine to use their DNS servers, because your VPN address is allowed. That is what I recommend. In my case, I’m running my own DNS server, but most people won’t have that option. You might want to try OpenDNS. Here’s more information about using DD-WRT with OpenDNS.
Ultimately, with the OpenVPN configuration, I did add ns1.sonic.net and ns2.sonic.net, and then I had to change the IP/Name field of the VPN configuration from beta.vpn.sonic.net to 184.23.168.54. This makes sense — DNS won’t work until the VPN is established, so you have to use the IP address when establishing the VPN connection. - The NVG589 and R7000 must be on separate subnets. I left the NVG589 at its default of 192.168.1.254 and reconfigured the R7000.
- On the R7000, set Basic Setup → Network Setup → Local IP Address to 192.168.2.1, subnet mask 255.2555.255.0.
- On the R7000 Basic Setup → Network Setup → Network Address Server Settings (DHCP)
- DHCP Server: enable
- Start IP Address: 192.168.2.100
- I checked the checkboxes for DNSMasq for DHCP/DNS and DHCP-Authoritative
- On my LAN I had various machines I wanted to give consistent IP Addresses. This may not be an issue for others. I decided to let DHCP assign them, but remember them by MAC address so that they always are assigned the same IP address. This makes it easy to administer everything in the router.
- On the Services page under DHCP Server, I selected “LAN & WAN” under Used Domain. This makes the hosts on your LAN mutually accessible by the names you enter under Static Leases. For LAN Domain you can put anything, like “mylocal.lan.”
- I added static leases under Services → DHCP Server by clicking Add and filling in the fields, and then clicking Save and Apply Settings at the bottom of the page. I repeated this for the hosts I wanted to have static IP addresses. You can easily find the MAC addresses on the Status → LAN page.
- Under Services → DNSMasq, enable DNSMasq and No DNS Rebind.
- Under Basic Setup → Network Setup → Time Settings, choose the time zone (America/Los Angeles) and enter the ip address of a time server. Initially I entered the name, but that caused a connection error: when DNS was not yet set up, the time got set to 1969, and then OpenVPN wouldn’t connect because the certificate was invalid due to the incorrect time.
dig +short time.sonic.net
64.142.1.20
Connecting other devices
- I have an Airvana/Airrave 2.5+ which is like a local cell tower that allows me to use my cell phone where I live (otherwise, no cell signal). I plugged it into the R7000 and it worked fine.
- The ATA box that supplies VOIP via Sonic also is plugged into the R7000.
Setting up the VPN
The first step is to test the VPN by connecting to it with your computer. If you have a simple network configuration (i.e. one computer and no supplementary router) then this is all you need. If you have a more complex network, test the VPN first from your computer before continuing to the next step of getting it running on your router.
- For OpenVPN go here and follow the instructions. (Recommended!)
- For IPSEC go here. I did this for both Ubuntu Linux and Mac OSX. Enter the values you get from your VPN service provider.
- On the Mac, go to the the Network Settings preferences, and create a new network entry (the “+” sign in the lower left corner).
- On Ubuntu I used Network Manager → Configure VPN → Add to create a new VPN connection.
- Reconnect. If you are running the VPN from your computer (as opposed to the router configuration described below) you may want to consider how to make sure the VPN connection stays up. I notice that it tends to drop back to my default (AT&T) connection when using IPSEC. Reports on the Sonic.net forums indicate there is a timeout of 13 hours. On Debian/Ubuntu they have enhanced the /etc/vpnc/vpnc-script so that you can insert your own custom action scripts to take in the following events.
Linux
If you are on Linux you can force a reconnect in the script-post-disconnect-action. Just create a script of that name in the /etc/vpnc directory. One other tweak is that you may have to change the Network Manager config file.
This may not even work when using Network Manager. The following configuration worked for me on Unbuntu 12.04, when running openvpn from the command line.-
/etc/vpnc/vpnc-script-post-disconnect-action
#!/bin/bash
# After losing the VPN connection attempt to reconnect with
# Network Manager.
logger "VPNC restarted due to disconnect"
nmcli con up id Sonic.net
-
/etc/NetworkManager/system-connections/Sonic.net
[connection]
id=Sonic.net
uuid=92e6b6ff-9ae9-4d65-8998-b7c577b4231c
type=vpn
timestamp=1434329926
[vpn]
service-type=org.freedesktop.NetworkManager.vpnc
NAT Traversal Mode=natt
#ipsec-secret-type=save
#IPSec secret-flags=0
#xauth-password-type=save
Vendor=cisco
Xauth username=my_user_name
IPSec gateway=208.201.249.242
Xauth password-flags=0
IPSec ID=Standard VPN
Perfect Forward Secrecy=server
IKE DH Group=dh2
[vpn-secrets]
Xauth password=my_password
IPSec secret=standard
[ipv4]
method=auto
-
Mac OSX
On OSX I followed the instructions here. However, this did not seem to work. If you get this working, let me know.
VPN on the R7000/DD-WRT router
I wanted to have the VPN connection created by DD-WRT, so that all the traffic flowing through the router would be routed through the VPN. I also wanted to have it auto-reconnect dropped connections. Sonic now supports both IPSEC and OpenVPN protocols (beta). I succeeded with both IPSEC and OpenVPN. However, OpenVPN is much easier to set up and doesn’t appear to drop connections. Choose OpenVPN if at all possible.
- OpenVPN This is much easier! OpenVPN is supported directly by the DD-WRT interface. Go to Services → VPN and enable OpenVPN. You will have gotten your openvpn.conf file from your VPN provider. Copy the values from there into the VPN config page, then click Save and Apply Settings. You can glean some information from Status → OpenVPN after starting it.
- Here is a screen capture of the configuration page.
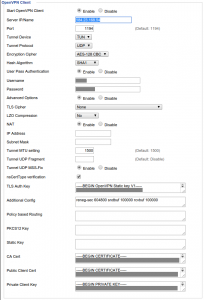
- If using the Sonic.net DNS servers (ns1.sonic.net and ns2.sonic.net) you need to set the VPN IP/Name to the IP address, as shown in the screen capture, not the name (currently beta.vpn.sonic.net).
- I added “keepalive 10 60” to the Additional Config section. However, I still get periodic disconnection, which remains a problem. If you figure out how to fix this disconnect problem, please let me know.
- Test it out!
- Check for DNS leaks.
- Here is a screen capture of the configuration page.
- IPSEC Sonic is using a Cisco VPN Concentrator which uses the IPSEC protocol. In order to get it working I followed these DD-WRT VPNC instructions.
- In order to get tunneling to work I modified the iptables rules given in the instructions slightly, as follows. If you don’t do that it won’t work, because it will drop all your packets before they get routed to the tunnel.
iptables -D FORWARD -j DROP
iptables -A FORWARD -o tun0 -j ACCEPT
iptables -A FORWARD -i tun0 -j ACCEPT
iptables -t nat -A POSTROUTING -o tun0 -j MASQUERADE
iptables -A FORWARD -i br0 -j ACCEPT
iptables -A FORWARD -j DROP - You can test the VPN connection from the command line if you are logged into the DD-WRT. Make sure that is working first. Then check from a computer on your LAN.
- In order to get tunneling to work I modified the iptables rules given in the instructions slightly, as follows. If you don’t do that it won’t work, because it will drop all your packets before they get routed to the tunnel.

DNS Leaks and WebRTC
There is another way you can leak your IP address. After you’ve gotten your VPN setup, be sure to test for the WebRTC leak. This link also has an explanation of what to do about it.
Click here for WebRTC leak test.
Conclusion
Whew! That’s a lot of work. Getting IPSEC working was a PITA, and it still appeared to drop connections, forcing more complicated configuration to make it reconnect. On the other hand, with OpenVPN things were a lot easier.
But, also, this was complicated because I made it complicated, and opted for a higher level of security and convenience. By forcing you to use their modem/router, and preventing root access, AT&T forces the use of a second router.
All this really should not be necessary! However, we now know a lot about the collusion between AT&T and the NSA in the illegal collection of Internet traffic, so you can’t exactly ignore it if you value your privacy. Here’s a NYTimes article on how AT&T Helped U.S. Spy on Internet on a Vast Scale.
Using a VPN is a first line of defense. If you want more anonymity you should use Tor. You can run Tor over the VPN for an additional layer of security.
Note that you already should be using a VPN when you are using your laptop in public Internet cafés, airport lounges, etc.